


 |
 |
 |
 |
||
|
ecobee3 Lite smart thermostat Shop Now in Community Energy's Marketplace! |
ecobee SmartSensor(s) (optional) Shop Now in Community Energy's Marketplace! |
ecobee trim kit |
Extender Kit |
Smart Phone |
ecobee screws and drywall |
|
|
|
|
|
|
|
|
Drill (with 3/16" drill bit) |
Hammer |
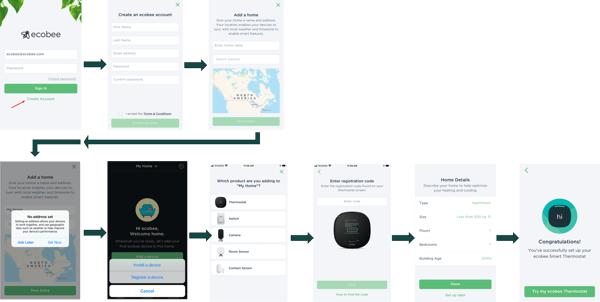
ecobee app |
Pencil |
Wire Stripper |
|
A. Remove old thermostat.
Before you begin, make sure to power off your HVAC equipment at your circuit breaker panel or master switch.
Next, you’ll need to verify that your thermostat is off. A large majority of digital thermostats are battery powered, which can make it difficult to tell if the power is off. But don’t worry! We’ve got you covered. Go to your thermostat and try to increase or decrease the temperature. During the winter, increase your heat setpoint above the current temperature. During the summer, decrease your cool setpoint below the current temperature. If your heating or cooling equipment responds to the temperature adjustment, it is not powered off. You can also check to see if everything is powered off by feeling for air movement above your vents or listening for system noise before continuing.
Gently remove your existing thermostat’s faceplate to determine compatibility. Many thermostats simply pop off or unclip from the base, while others have screws that will need to be removed.
Check the wires to see if you have a line voltage system. Do not proceed if voltage labels read 110v or higher, if you see terminal blocks listed as L1 or L2, if your thermostat has thick wires connected to wire nuts or if you see any kind of danger, warning or caution symbol. In these cases, your system is a line voltage system and you’re not compatible.
If you’re unsure about compatibility, visit https://www.ecobee.com/compatibility/ to try their online compatibility checker. You can also give them a call at 1-877-932-6233 and they’ll help you figure it out.
Take a picture of your old thermostat's wiring in case you need it for reference later.
Using the wire label stickers provided, one-by-one remove and label each wire with the name of the terminal it was connected to. For example, add the “Y/Y1” sticker to the wire that was pulled from the “Y” or “Y1” terminal.
Some thermostats will have a jumper wire between the “Rc” and “Rh” or “Ry” wires. If you have a jumper, ignore it. Only label the wires that run from your wall into a terminal block.
Gently remove the thermostat backplate, being careful not to let the wires fall into the recess of your wall.
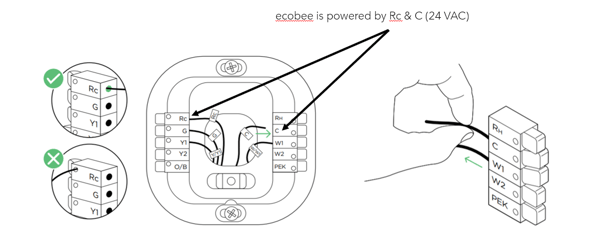
WiFi-connected thermostats require power to operate. You can power your ecobee3 Lite with 24v supplied by a wire labelled “C.” Don’t have a “C” wire? You’ll need to use the Power Extender Kit to complete your installation. If you do have a “C” wire, please continue with the installation instructions provided below.
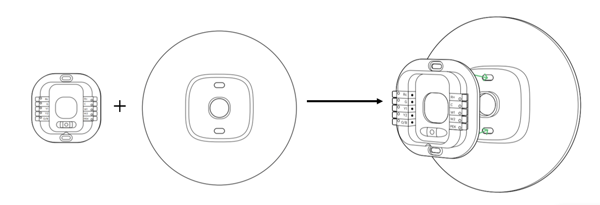
B. Install ecobee base.
Decide if you want to use the large trim plate with your ecobee3 Lite. The trim plate is useful if you want to hide paint marks or holes in your wall left by previous thermostats. If you’d like to use the trim plate, align the mounting holes on the trim plate and back plate and press them into place together. The back plate should sit flush against the trim plate when it’s attached correctly.
Position your ecobee3 Lite backplate over the existing wire hole. To verify that the previous screw holes are covered, use the built in level to level the backplate, then using the backplate as a template, mark the location of the mounting holes on the wall with a pencil. Drill two holes and mount the backplate using the drywall plugs and screws provided in your package.
C. Connect the wires.
Using the labels as a guide, connect the wires to the designated terminals on your new thermostat backplate. For example, insert the wire labelled “G” into the “G” terminal. If you only have one “R” wire, make sure to connect it to the “Rc” terminal, not the “Rh” terminal.
Gently tug on the wires to ensure they are installed correctly. When the wires are inserted correctly, the levers will lower. If you insert a wire into an incorrect terminal, simply push down on the lever, and pull on the wire gently to release it. Then, connect it to the correct terminal.
Once you've connected your new thermostat backplate, push any excess wiring back into the recess of the wall. This will make sure your thermostat sits flat against the backplate and doesn't rock or tilt it.
D. Attach ecobee3 Lite display.
Now, line the thermostat up with the mounted backplate and gently press the thermostat into the backplate until it clicks into place.
If you look at the back of the thermostat, it should fit flush with the backplate and should not wobble when you touch the front. Your ecobee3 Lite is now ready for the next step! Turn your HVAC equipment back on at your circuit breaker and your ecobee3 Lite will come to life. To complete your set-up, follow the instructions on your ecobee screen.
To download an installation guide for your ecobee3 Lite, click here.
Still having trouble? Visit ecobee.com/Support or call 1-877-932-6233.
If you prefer not to DIY install, find an ecobee Pro: https://www.ecobee.com/en-us/services/find-a-pro/


